Mineralogy-Petrology--Thin Sections- Part 1-Mineral identification
Earth Science Extras
by Russ Colson
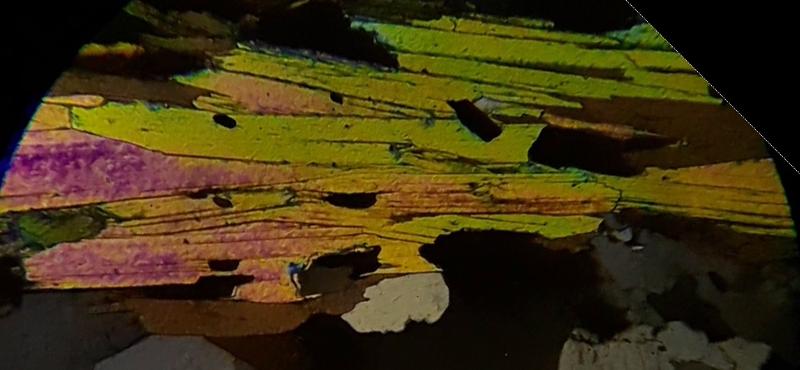
Photomicrograph of muscovite, biotite, and quartz under crossed Nicols. The speckled appearance is characteristic of mica, and called bird's eye texture.
Although microscopic work is no longer the primary analytical methodology in petrology that it once was, it remains a valuable tool in the study of rock texture and mineralogy. It is also a great way to gain a better understanding of the nature of textures and minerals than can be achieved by looking at hand samples alone.
The exercises in this lesson are mainly intended to practice a basic utility in the use of the petrographic microscope for general (non-analytical) purposes for the identification of minerals and the interpretation of textures. Before tackling this lesson, you should have a basic knowledge of common rock-forming minerals and their properties, particularly properties of cleavage, color and opacity. In the course of this lesson, you will also think about properties of refractive index and interference colors, which can be readily looked up online.
You should also have an understanding of basic interpretations of the textures of igneous and metamorphic rocks, particularly aphanitic and phanertic textures, porphyritic textures, reaction rims (coranae) and other reaction textures, euhedral and anhedral textures, and other basic elements of rock interpretation. This 3-part lesson deals with common minerals (quartz, feldspars, micas, olivine, pyroxene, hornblende, garnet, calcite, and opaque minerals) and common rock types, including igneous rocks (gabbro, granite, diorite, andesite), sedimentary rocks (limestones, sandstone, and arkose), and one metamorphic sample (gneiss).
For a more in-depth examination of analytical petrography, there are many substantial reviews of the use of the petrographic microscope, including, as of this writing, material available at
https://serc.carleton.edu/NAGTWorkshops/mineralogy/optical_mineralogy_petrography.html
and
https://d32ogoqmya1dw8.cloudfront.net/files/NAGTWorkshops/mineralogy/thin_section_microscopy.pdf
A petrographic microscope differs from microscopes that merely magnify an image in that it includes the use of polarized light to examine the crystal structure of the minerals under examination. Polarized light, in this case, is light that is constrained to 'vibrate' in only a single plane or direction. Light can be thought of as a wave, and polarized light is light in which the wave is rising and falling in only a single plane.
This polarized light, called 'plane' light, passes through a rock sample that is ground to be exactly 30 micrometers thick. When the plane light encounters the electromagnetic field generated by the regular array of atoms in a crystalline structure, it is broken into two separate rays of light that pass through the crystal at different speeds (because each ray is encountering a slightly different pattern of electromagnetic forces within the crystal). These two rays of light have vibration directions different from each other and, in general, different from the original plane light.
The two rays emerge from the crystal and travel up the optic train the the viewers eye. A sample that is viewed in this way is said to be viewed in plane light.
With a petrographic microscope, it is possible to insert a second polarizing lens into the optic train between the sample and the eye. This second polarizing lens is oriented perpendicular to the first and is called the analyzer lens. The analyzer lens resolves the two rays emerging from the sample into only a single ray vibrating in the plane perpendicular to the plane of the original polarized light. A sample viewed in this way is said to be viewed with crossed polarizers, or crossed Nicols (Nicol was the name of the geologist/physicist who developed these optical microscopy methods).
A conceptual illustration of the polarizing lenses of the petrographic microscope is shown below.
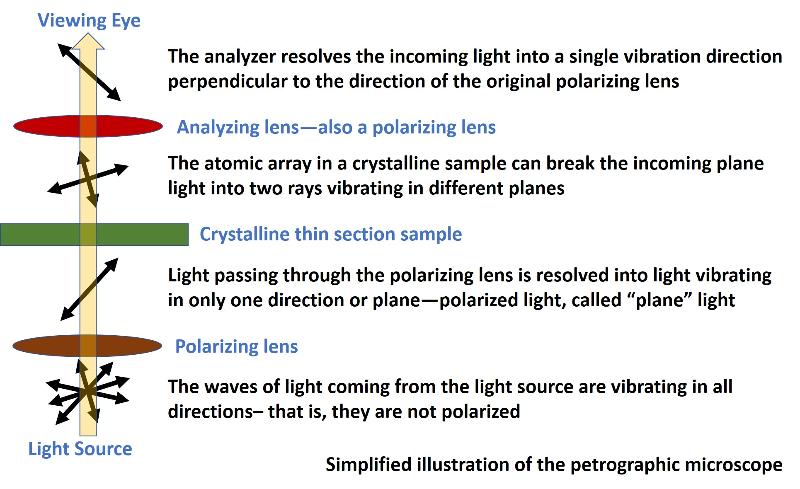
Not all materials will generate the two separate rays when the plane light passes through them. For example, amorphous materials, like liquids or glasses, do not have a regular pattern of atoms (that is, no crystal lattice), and so do not break the light into two rays or change the plane in which the light is vibrating. This type of material is said to be isotropic. Thus, polarized light passes through this type the sample without changing its direction of vibration. When it encounters the analyzer lens, which only lets light through that is vibrating perpendicular to the original polarizing lens, this light is blocked, and so any amorphous material viewed under crossed Nicols will always be perfectly black (even though it will be clear in plane light).
This allows us to easily spot glassy materials (like obsidian) or holes in the sample where only the glass slide is revealed.
Isometric minerals can also be isotropic even though they are not amorphous. This is because an isometric mineral is highly symmetric such that the array of atoms is the same in all directions. Because the array of atoms is the same in all directions, light passes through without being broken into separate rays. Under crossed Nichols, these minerals will appear black, even if they are clear when viewed under plane light.
Even in non-isometric, non-amorphous materials, the mineral will go black as the stage with the sample on it is rotated. As the stage is rotated, the mineral will eventually line up such that one of the planes of light vibration in the crystal matches up with the plane of the light from the polarizing lens, and all of the light energy stays in the same plane of vibration as the original plane light. When this light encounters the analyzer lens, which only lets through light vibrating perpendicular to the original plane light, it is blocked, and the sample will 'go black.' This is called 'going to extinction.' This happens 4 times during a 360 degree rotation, or once every 90 degrees.
Because the waves traveling through a non-isotropic, non-amorphous material travel at different speeds, the waves get out-of-sync before they emerge from the crystal. When these waves are recombined in the analyzer lens, waves that are perfectly out of sync will cancel, and waves that are in-sync will be brighter. Because different colors of light have different wavelengths, some colors will be out of sync and destructively interfere, and some colors will be in sync and constructively interfere. We will see the colors that are constructively interfering. This causes colors called interference colors. These colors are a type of diffraction pattern, like the colors that you see when light shines on oil over water in parking lot.
Information about interference colors of minerals can give us information about the mineral, which can be combined with other properties of the mineral, like color, opacity, or cleavage, to help identify the mineral. A short example tutorial examination of two minerals in a gabbro is shown in the linked page below. You can click the buttons to rotate the stage and read the notes about the different features that are seen in both plane light and with crossed Nicols. Click on the image to start the tutorial.
.jpg)
The common rock-forming minerals that we are going to consider are the following: olivine, pyroxene, hornblende, quartz, plagioclase, alkali feldspar (perthitic), biotite, muscovite, garnet, and opaque minerals (magentite, ilmenite). You can find the identifying characteristics of these online by searching on words like "pyroxene", "properties" and "thin section." However, I also include a short list of some key characteristics of each of these minerals below. Be aware that not all characteristics will manifest in any individual grain or orientation of the grain. For example, depending on the angle of the slice of pyroxene seen in the thin section, only one of its cleavage plains might be visible, and sometimes the cleavage might be hard to spot at all. To do the mineral-identification exercises below, you need to be familiar with the following properties.
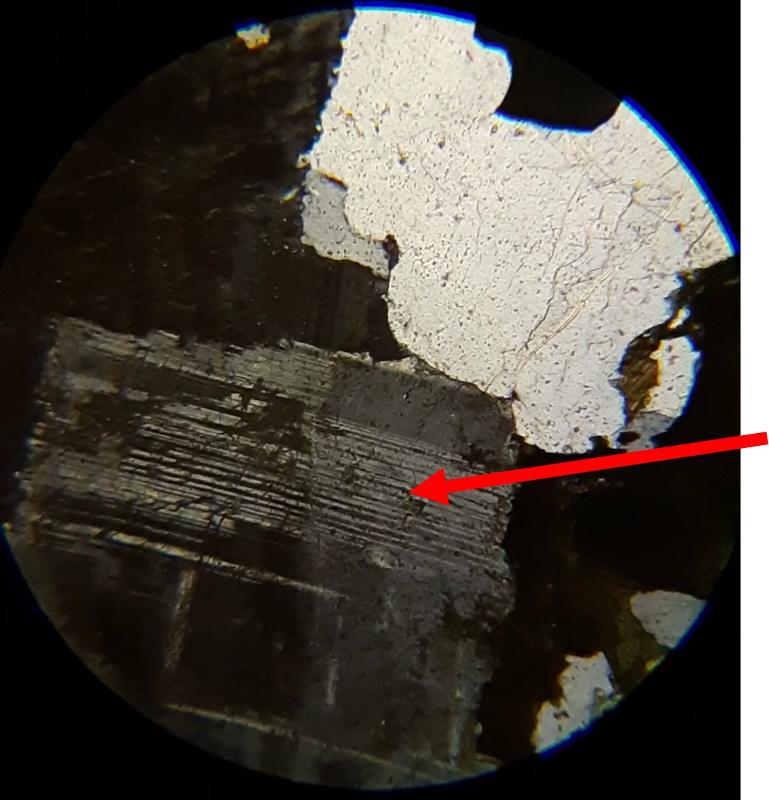
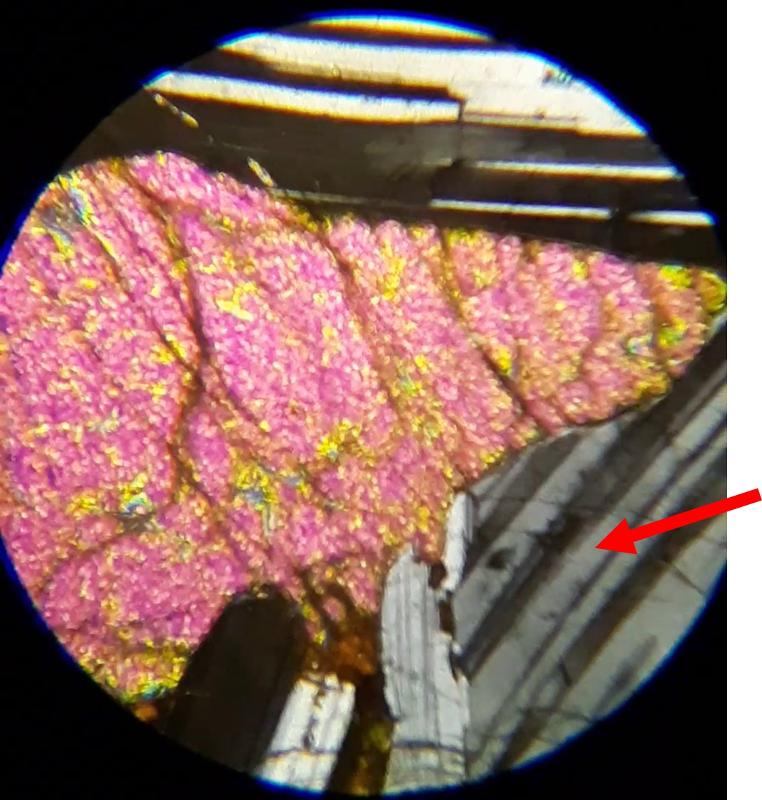
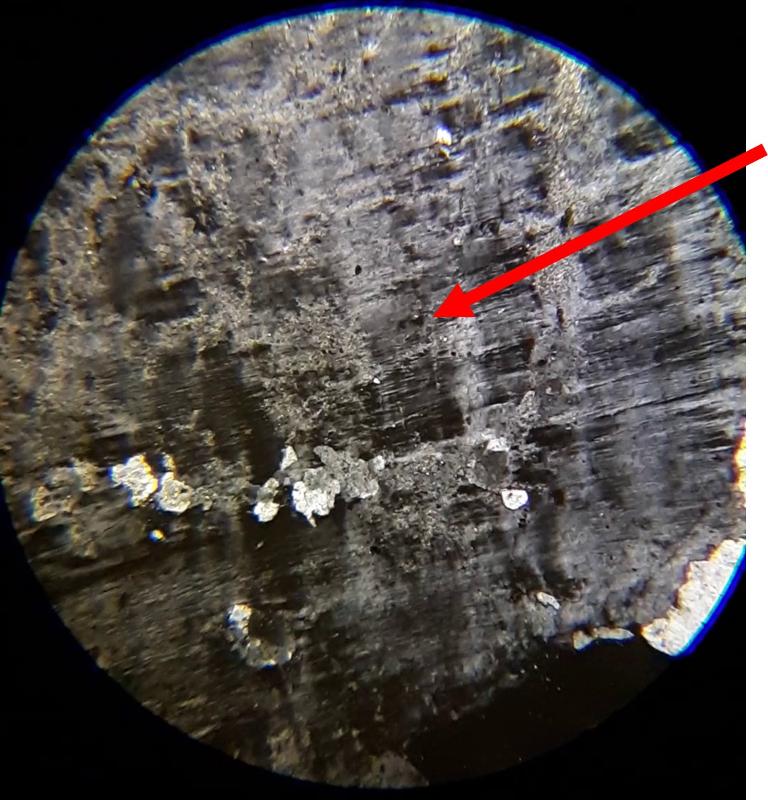
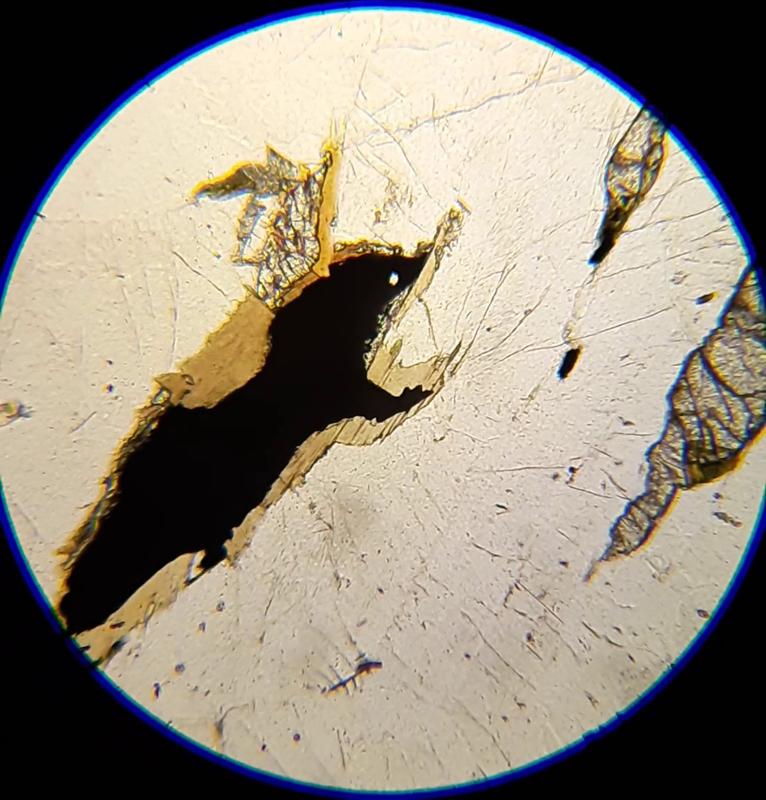
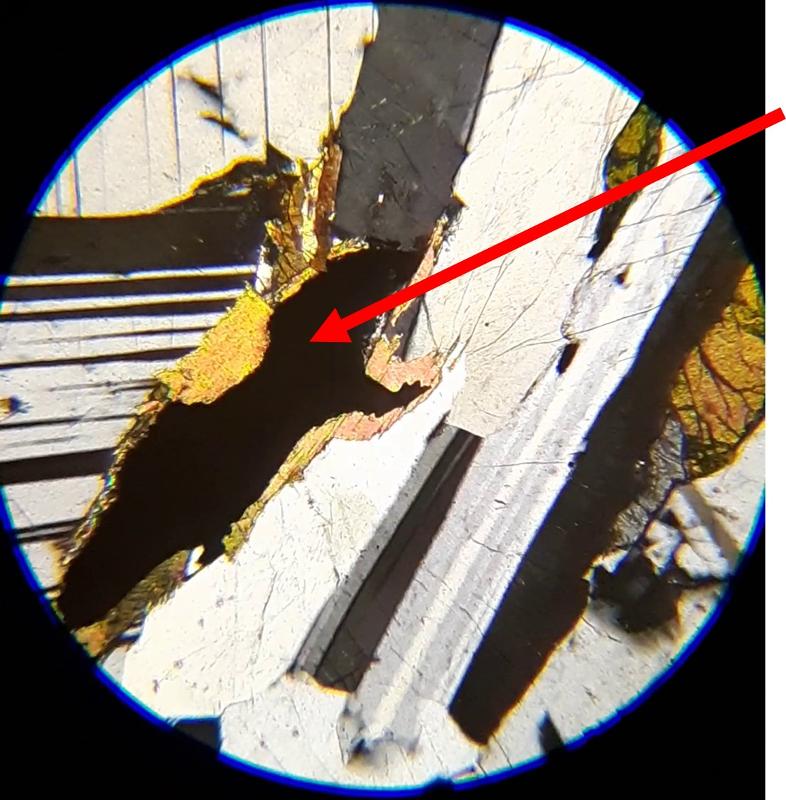
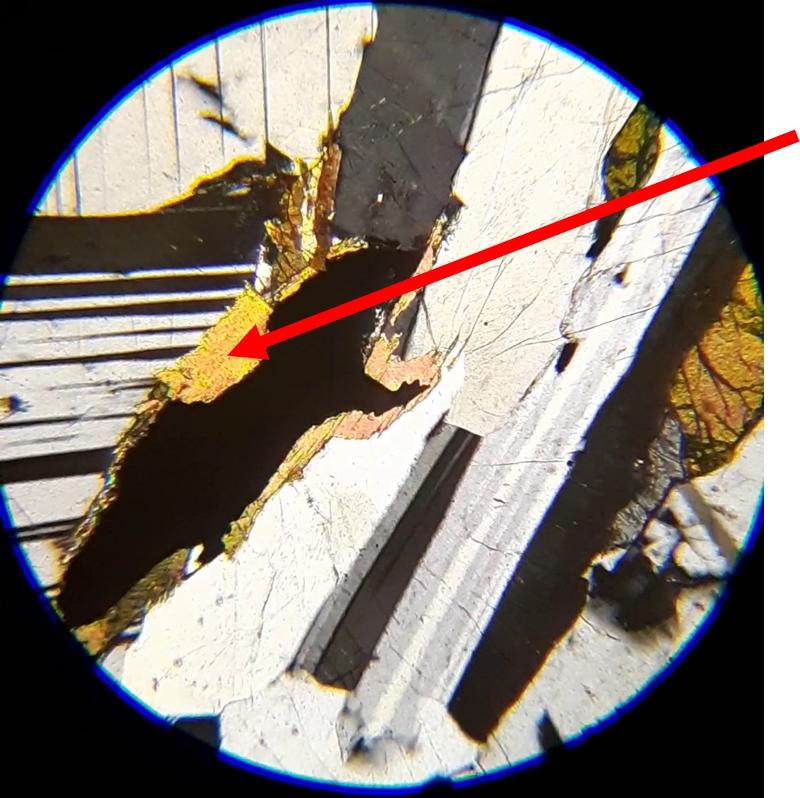
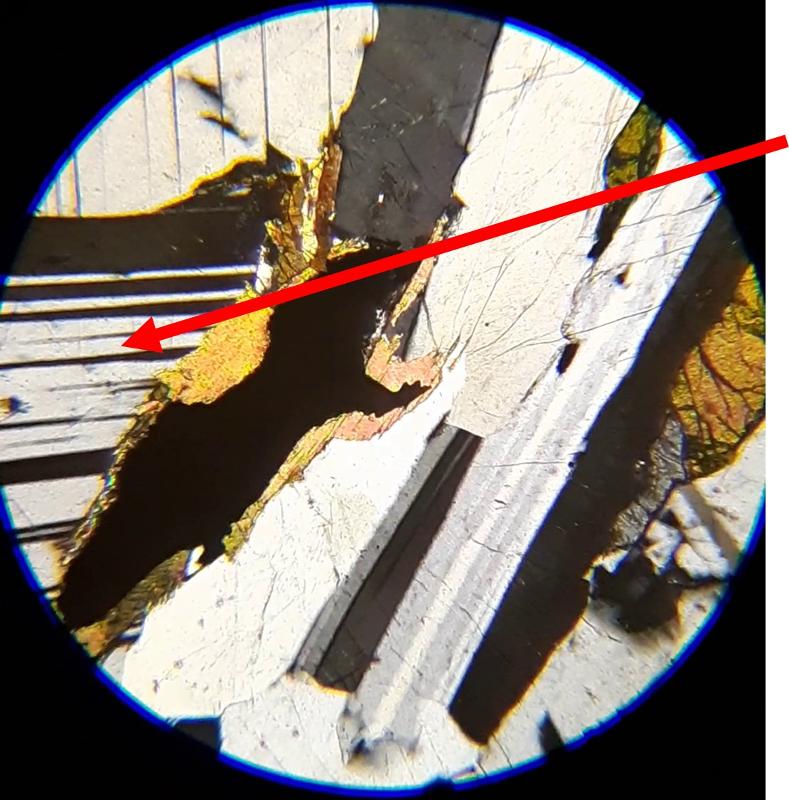
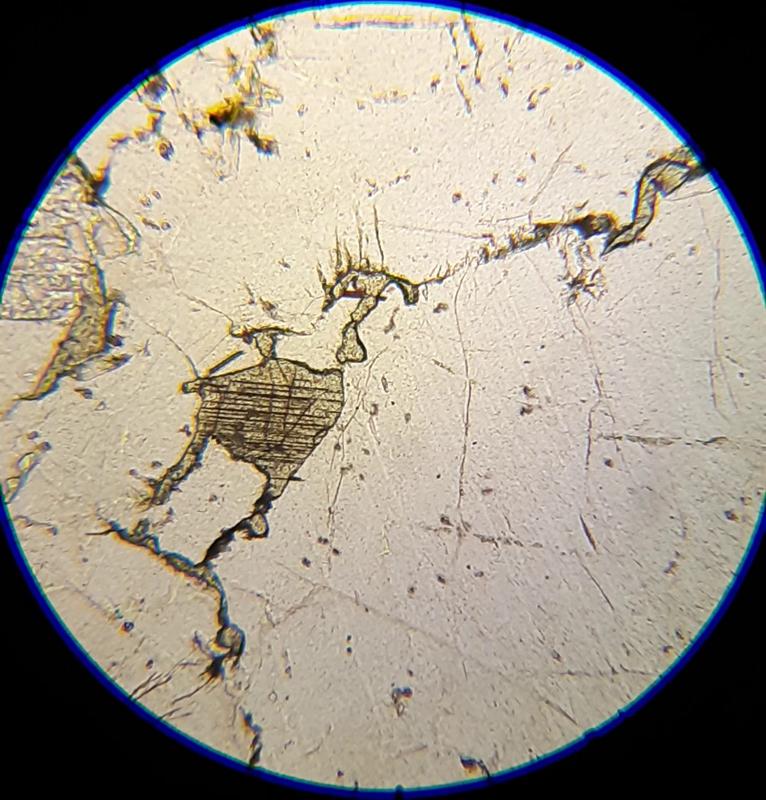
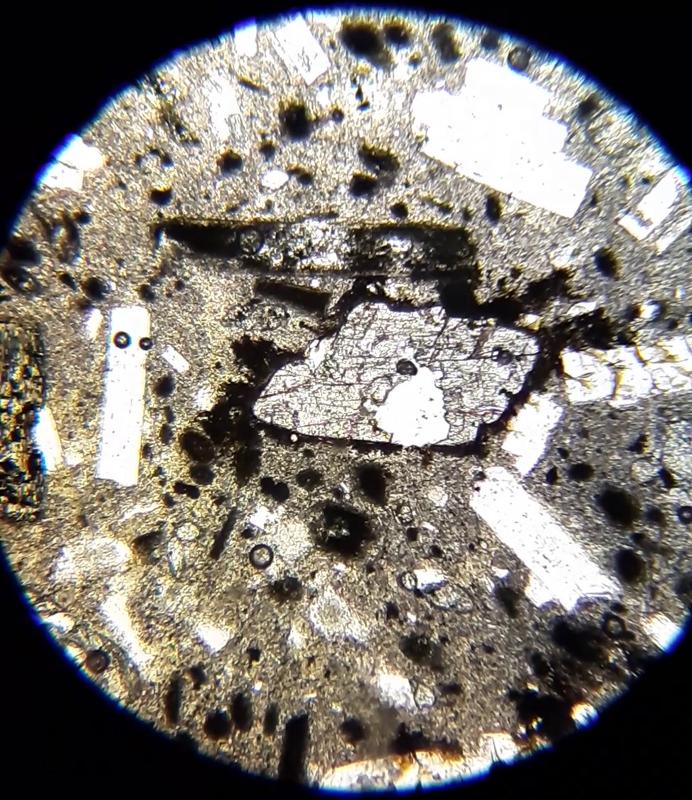
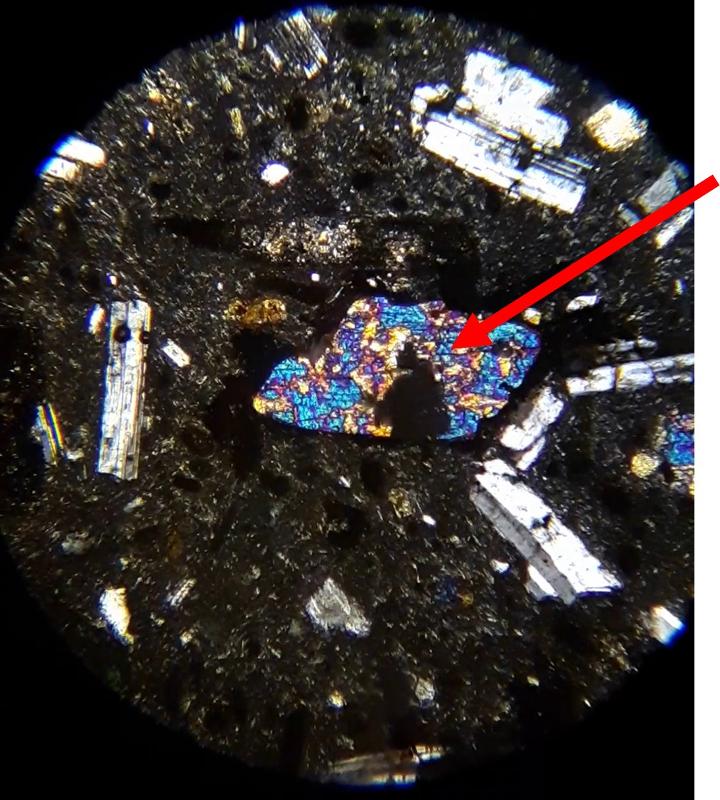
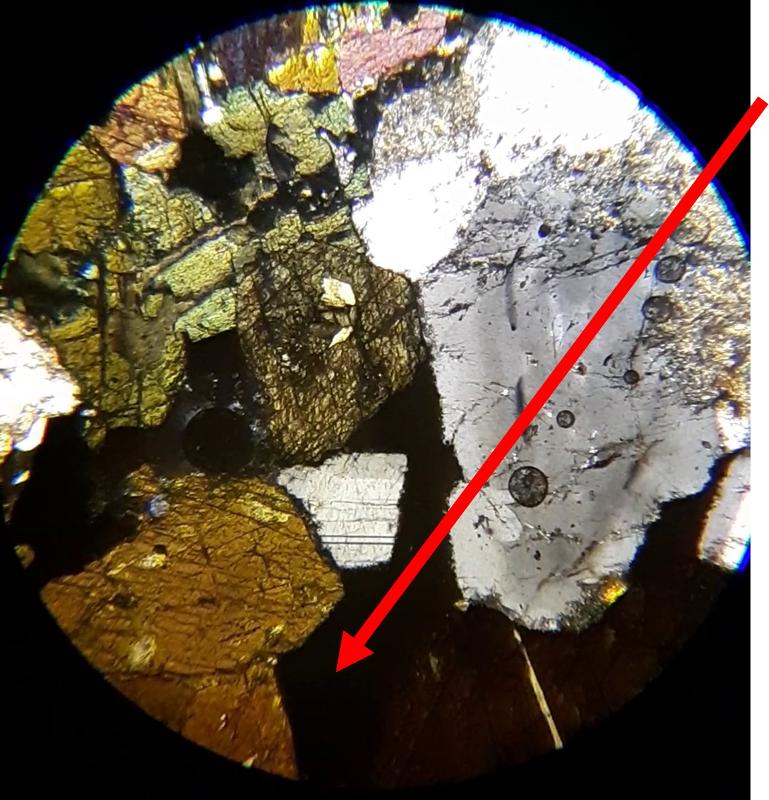
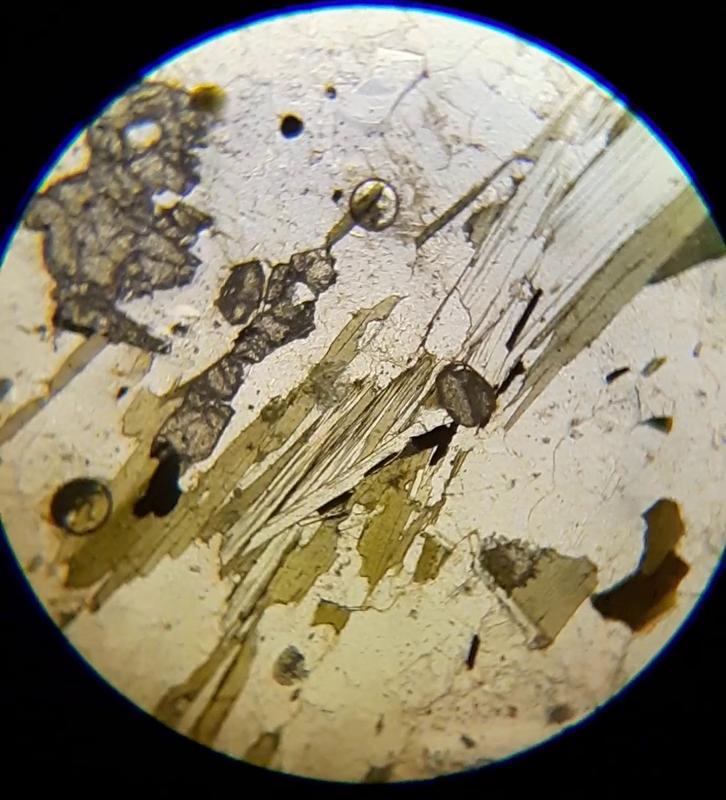
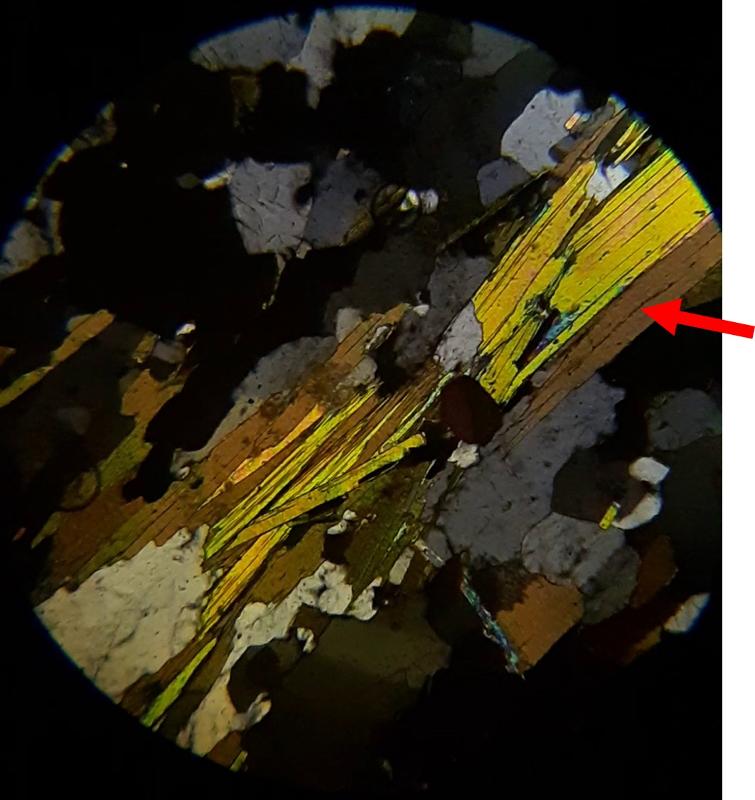
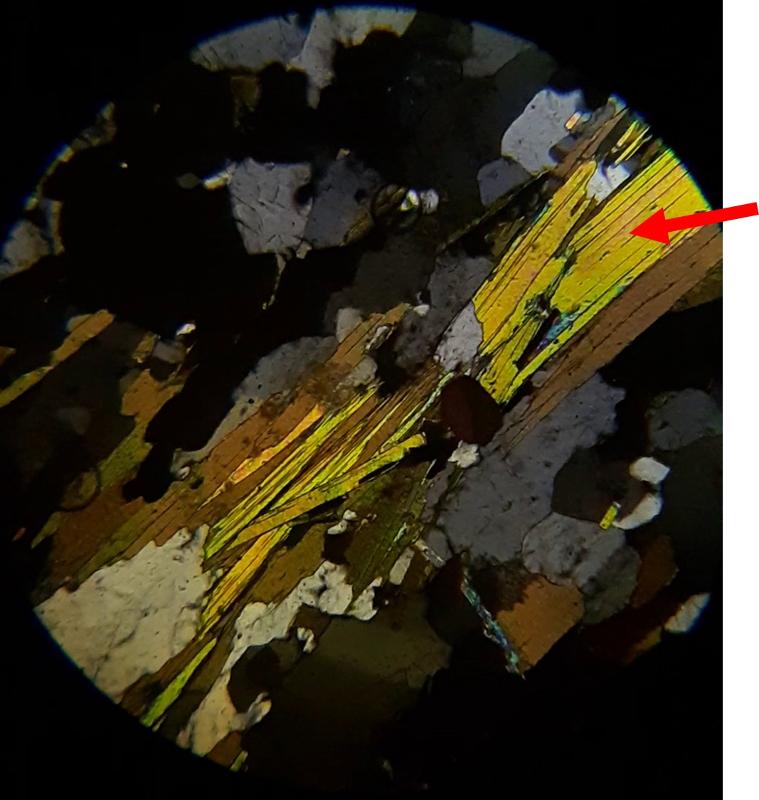
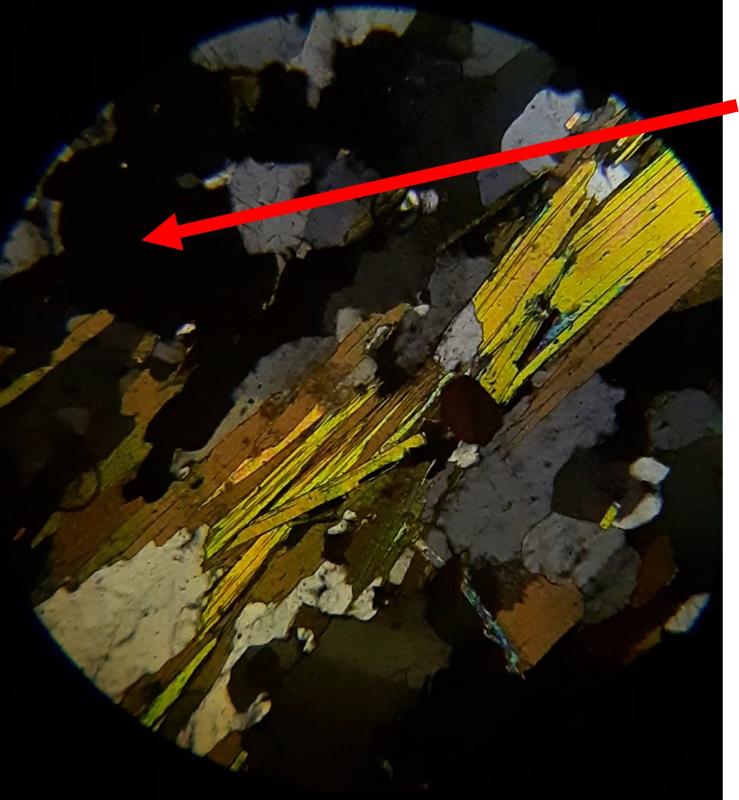
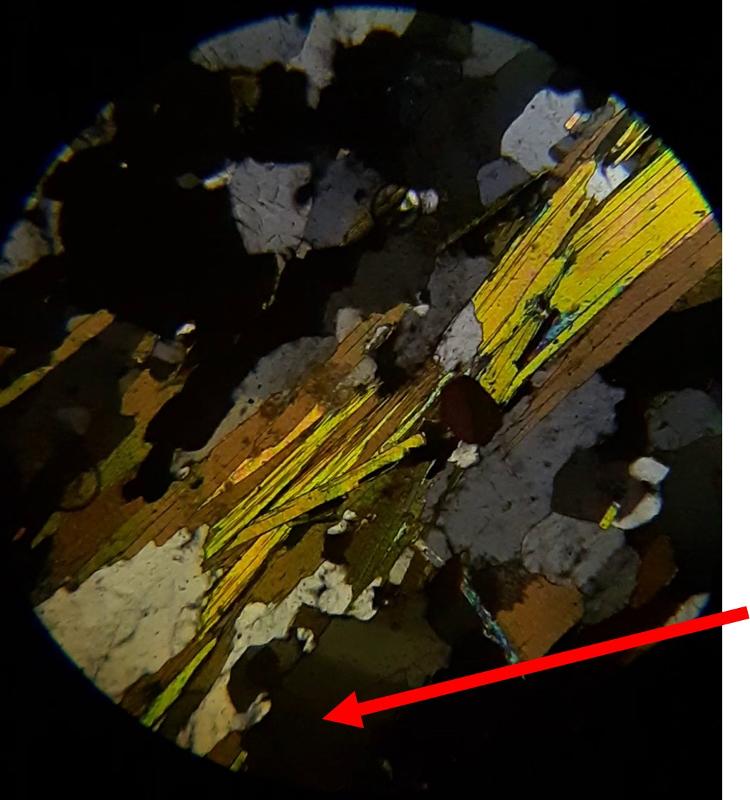
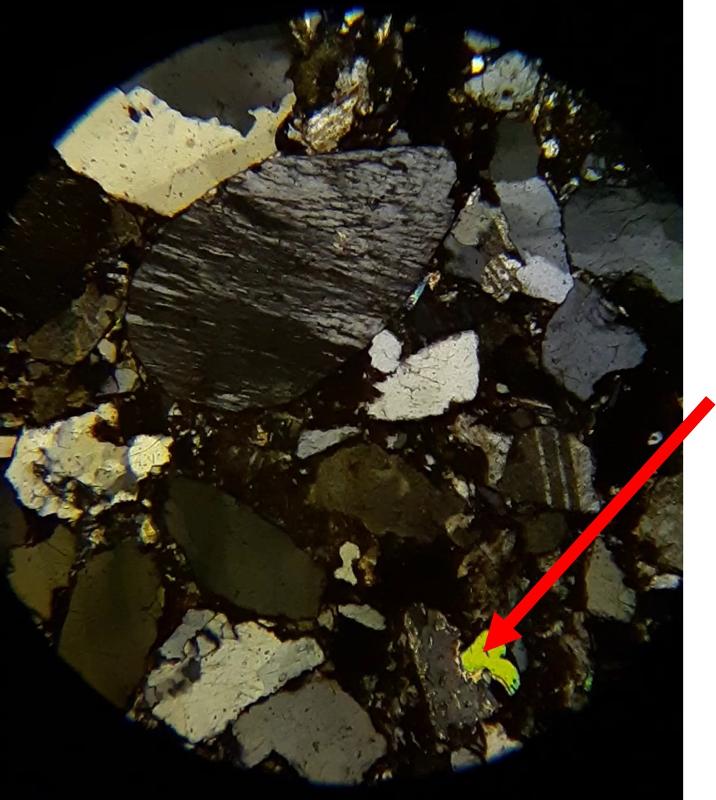
Identify the mineral indicated by the arrow (click on pictures to expand and rotate stage--plane light on the left, crossed Nicols on the right)
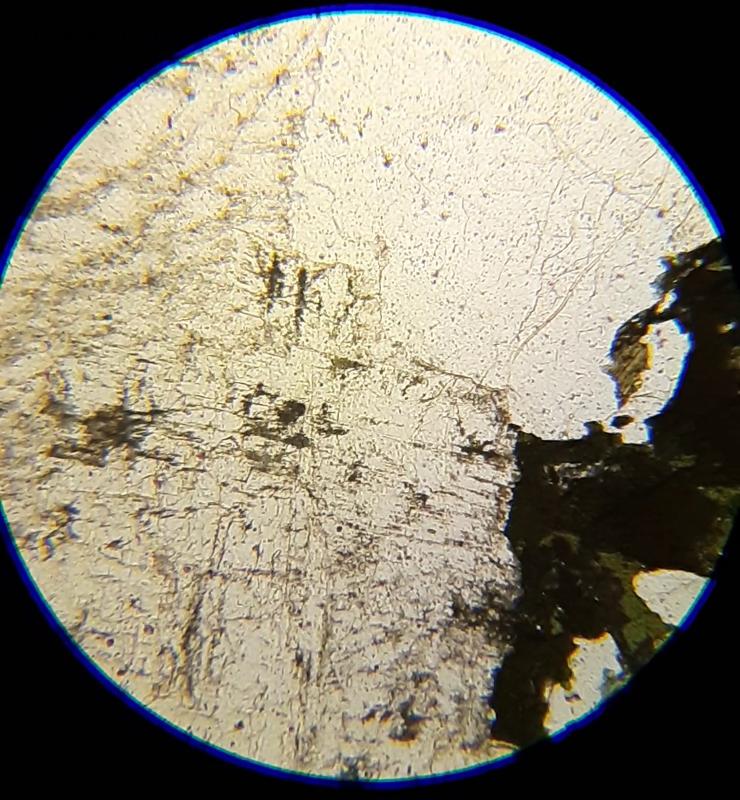
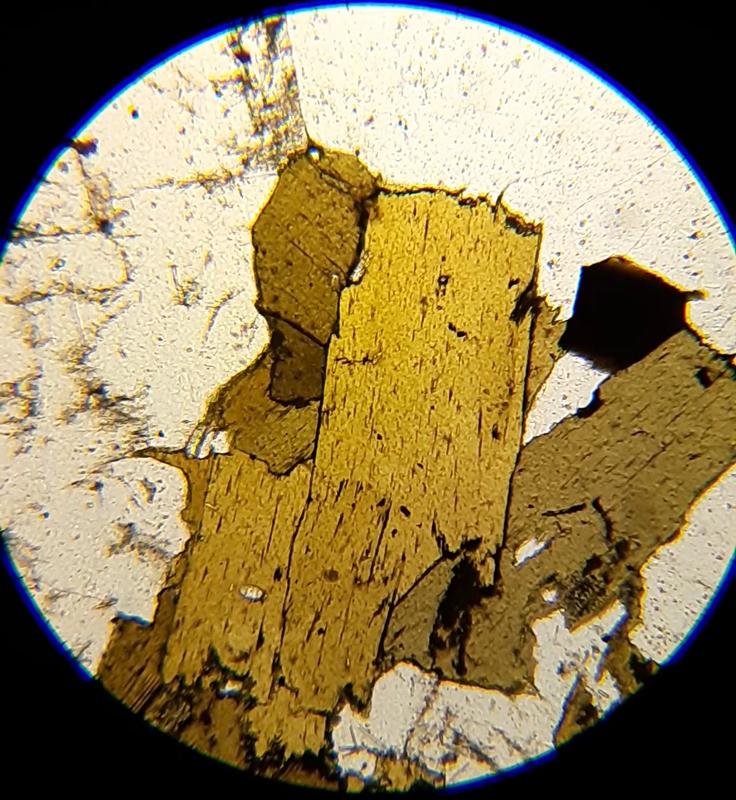
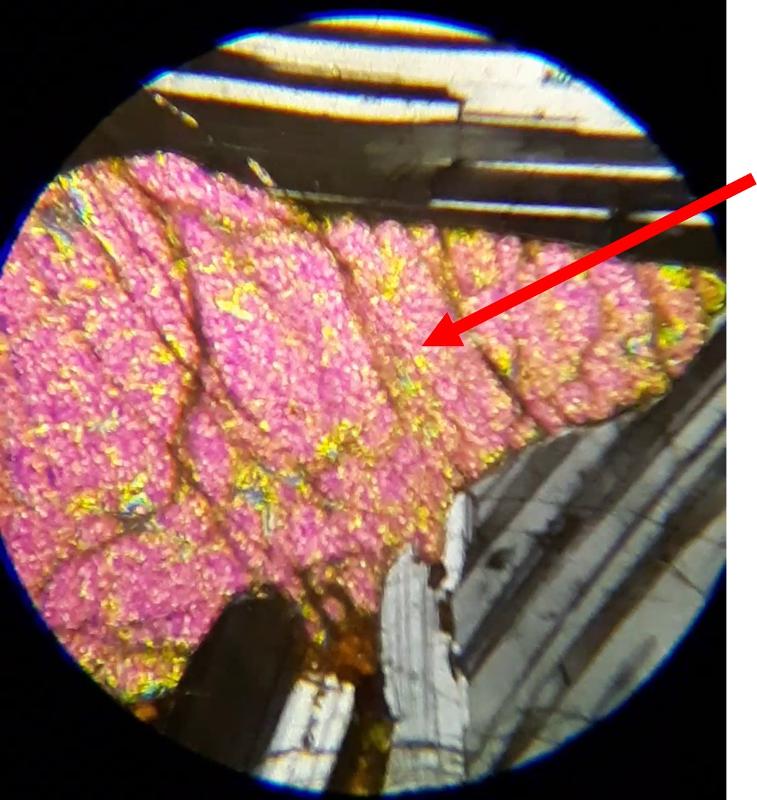
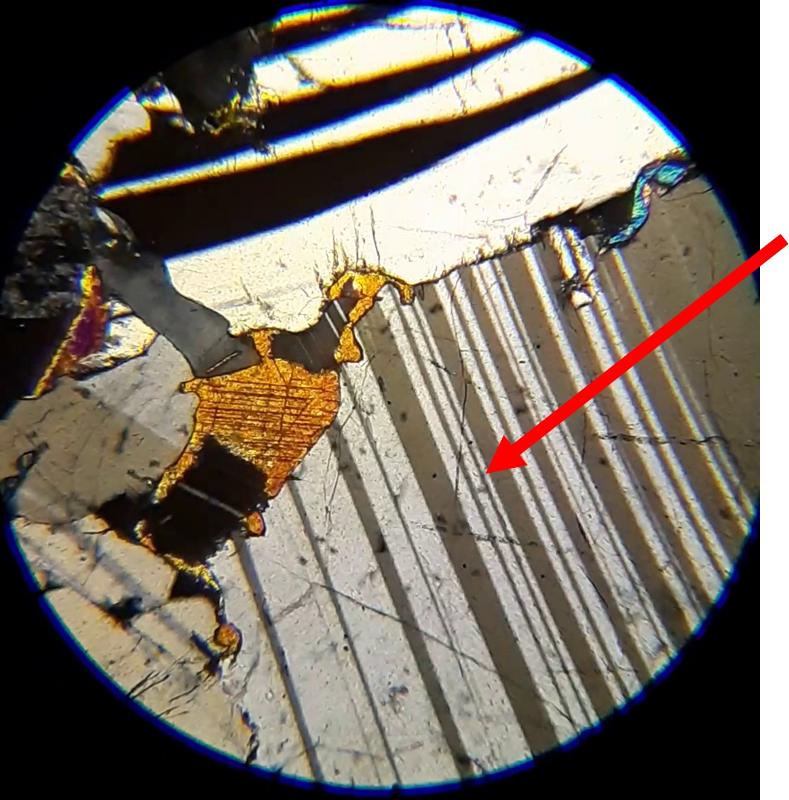
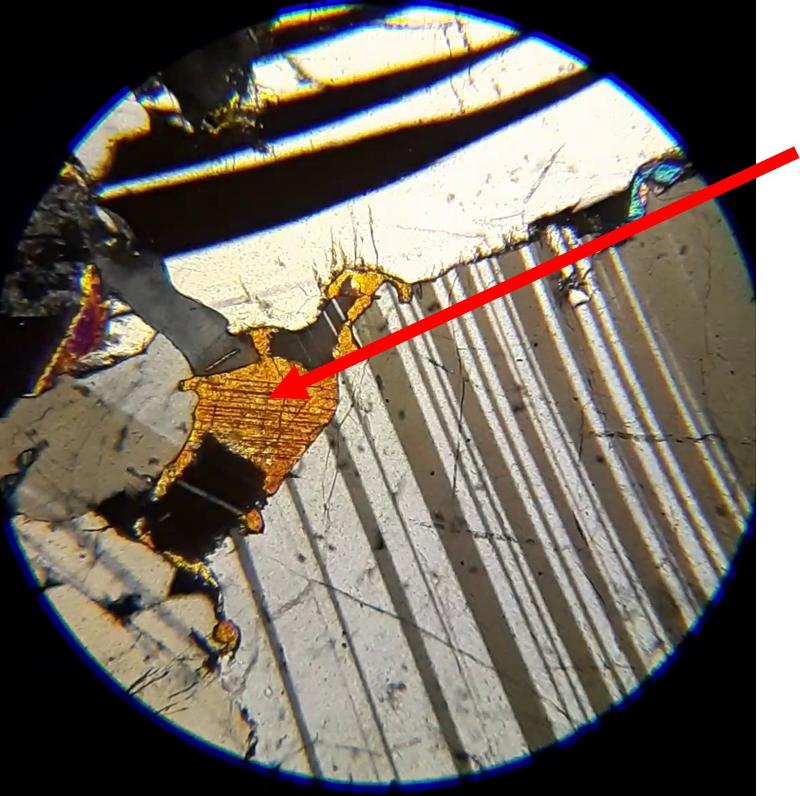
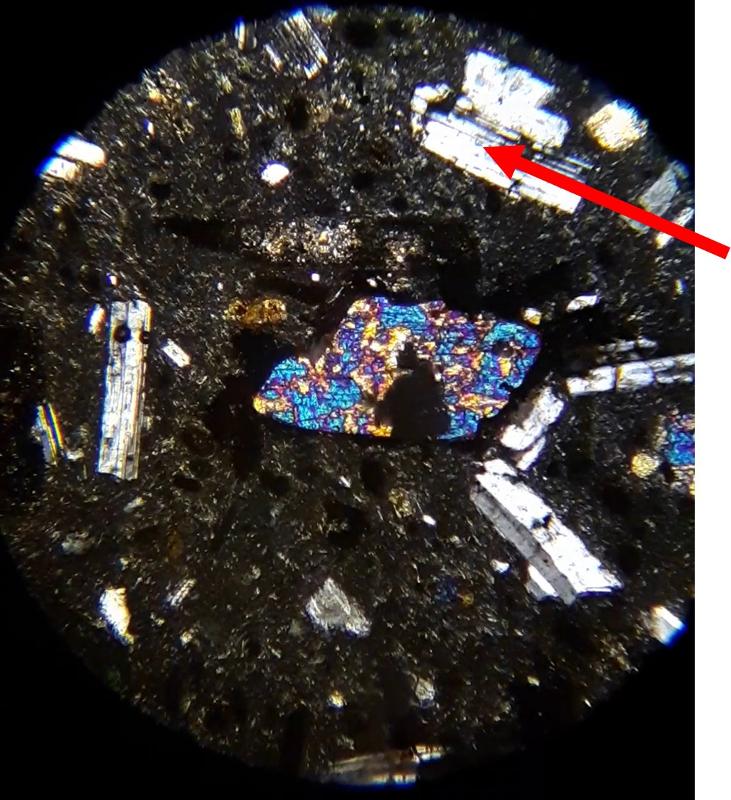
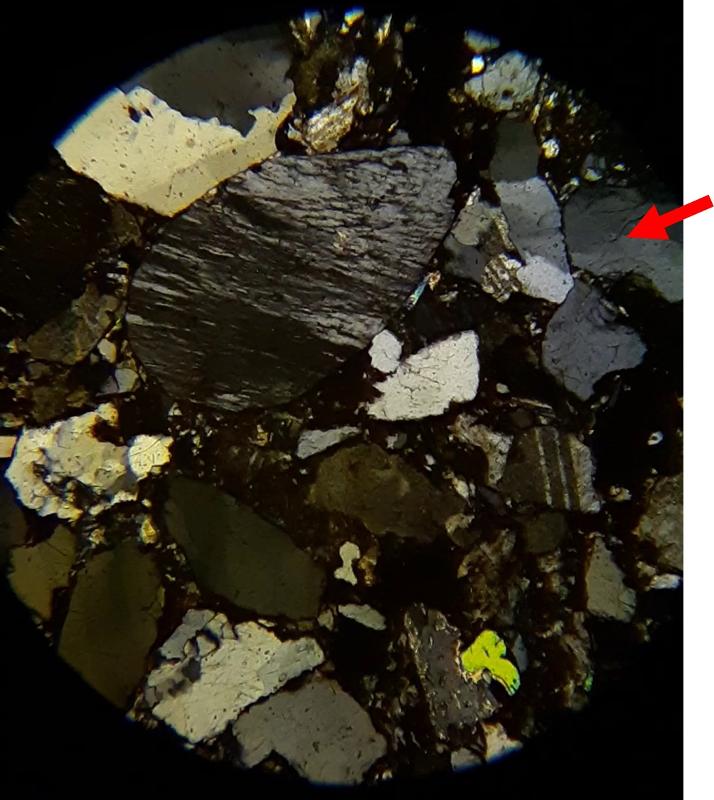
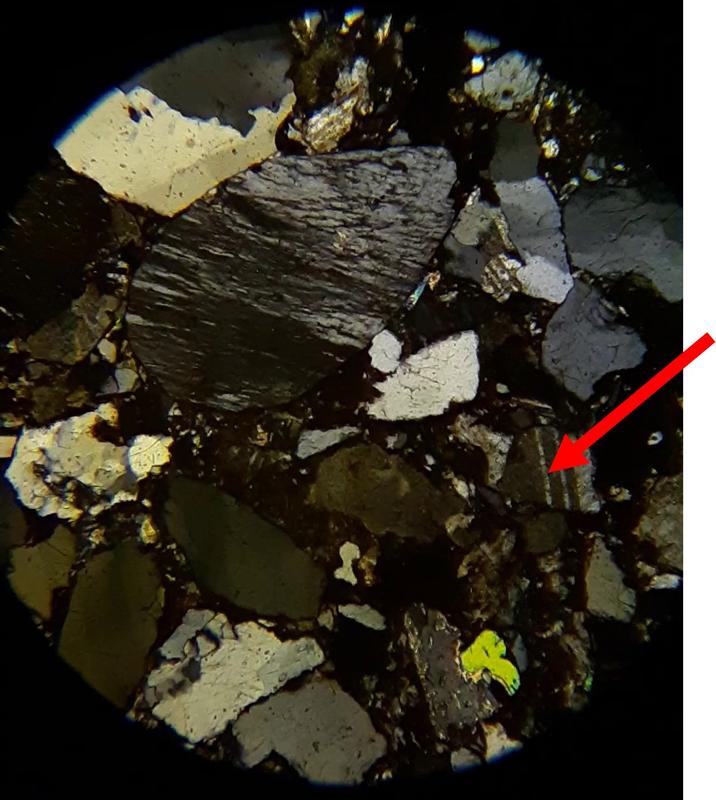
Identify the mineral indicated by the arrow (click on pictures to expand and rotate stage--plane light on the left, crossed Nicols on the right)
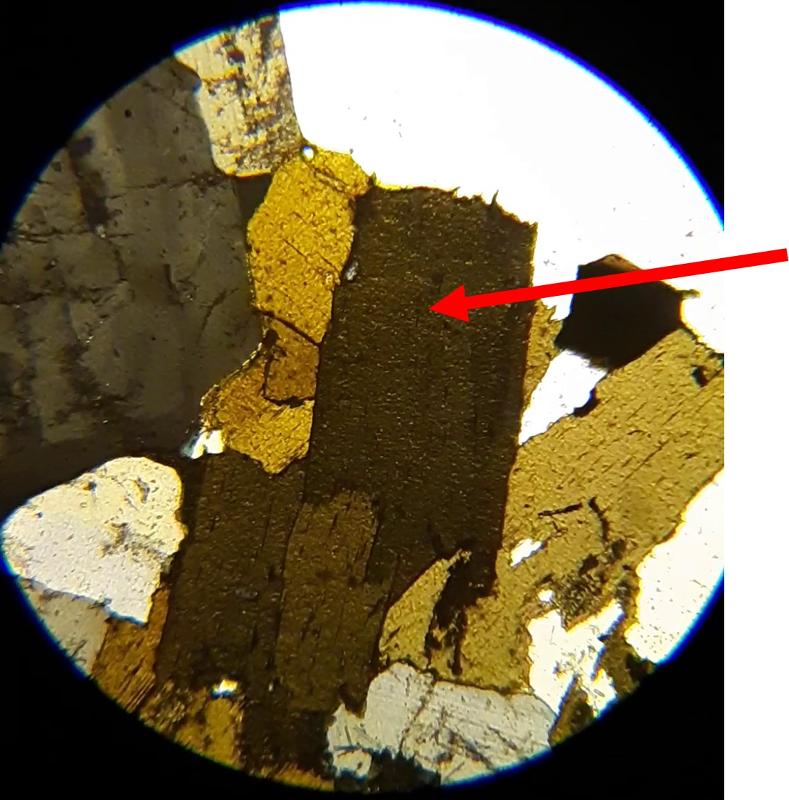
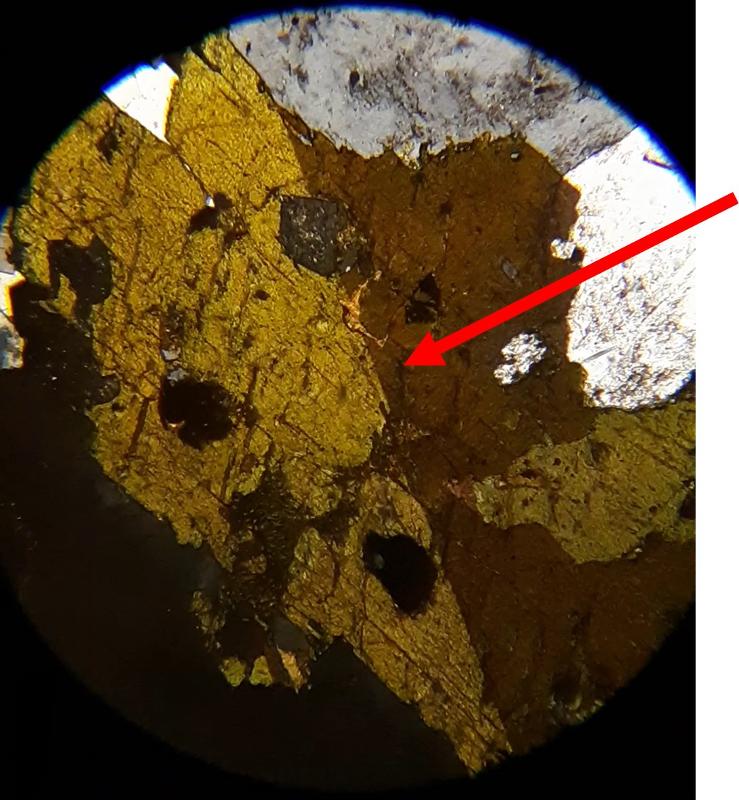
Identify the mineral indicated by the arrow (click on pictures to expand and rotate stage--plane light on the left, crossed Nicols on the right)
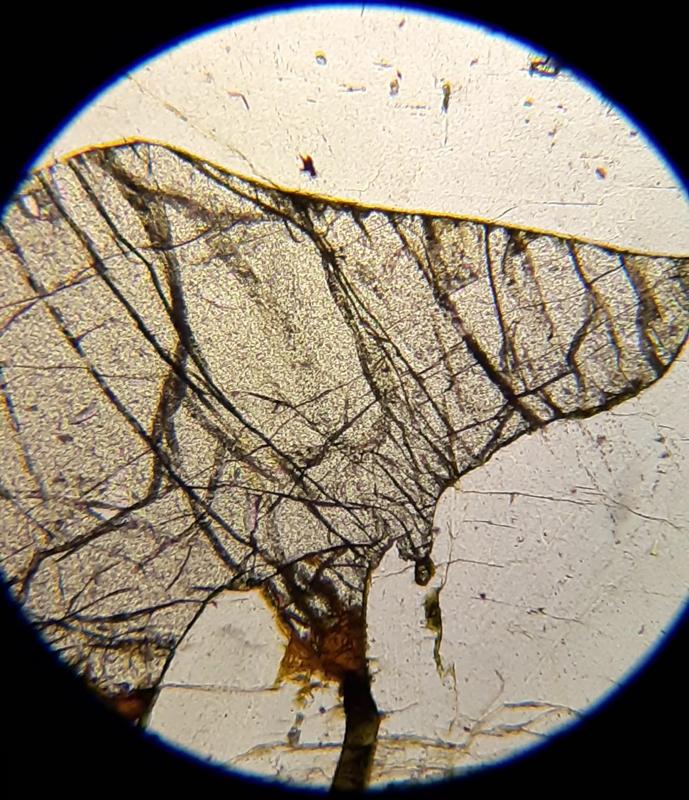
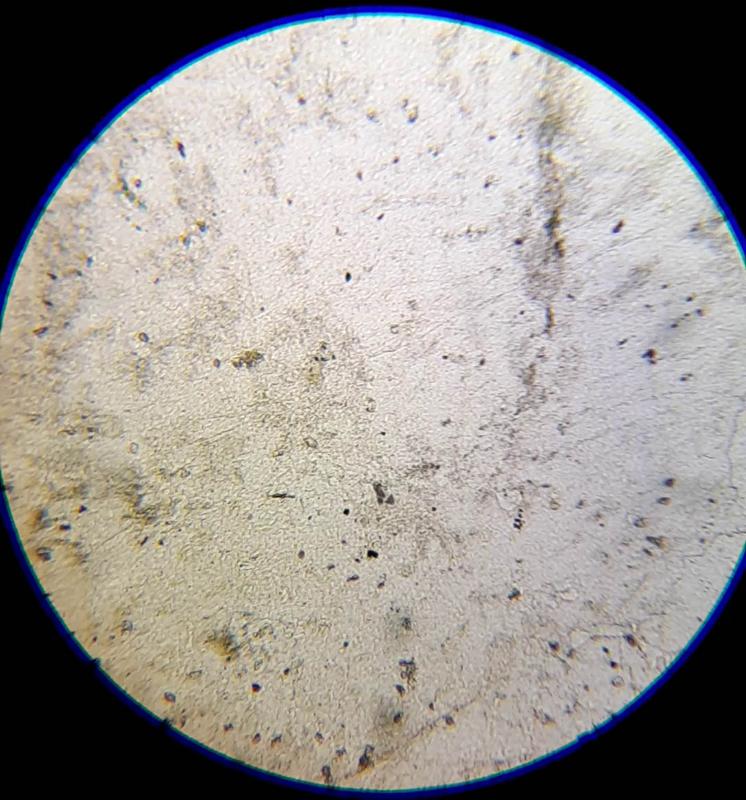
Identify the mineral indicated by the arrow (click on pictures to expand and rotate stage--plane light on the left, crossed Nicols on the right)
Identify the mineral indicated by the arrow (click on pictures to expand and rotate stage--plane light on the left, crossed Nicols on the right)
Identify the mineral indicated by the arrow (click on pictures to expand and rotate stage--plane light on the left, crossed Nicols on the right)

Identify the mineral indicated by the arrow (click on pictures to expand and rotate stage--plane light on the left, crossed Nicols on the right)
Identify the mineral indicated by the arrow (click on pictures to expand and rotate stage--plane light on the left, crossed Nicols on the right)
identify the mineral indicated by the arrow (click on pictures to expand and rotate stage--plane light on the left, crossed Nicols on the right)
identify the mineral indicated by the arrow (click on pictures to expand and rotate stage--plane light on the left, crossed Nicols on the right)
identify the mineral indicated by the arrow (click on pictures to expand and rotate stage--plane light on the left, crossed Nicols on the right)

Identify the mineral indicated by the arrow (click on pictures to expand and rotate stage--plane light on the left, crossed Nicols on the right)
Identify the mineral indicated by the arrow (click on pictures to expand and rotate stage--plane light on the left, crossed Nicols on the right)
Identify the mineral indicated by the arrow (click on pictures to expand and rotate stage--plane light on the left, crossed Nicols on the right)
Identify the mineral indicated by the arrow (click on pictures to expand and rotate stage--plane light on the left, crossed Nicols on the right)
Identify the mineral as indicated in the question (click on pictures to expand and rotate stage--plane light on the left, crossed Nicols on the right)

Identify the mineral indicated by the arrow (click on pictures to expand and rotate stage--plane light on the left, crossed Nicols on the right)
Identify the mineral indicated by the arrow (click on pictures to expand and rotate stage--plane light on the left, crossed Nicols on the right)

Identify the mineral indicated by the arrow (click on pictures to expand and rotate stage--plane light on the left, crossed Nicols on the right)
Identify the mineral indicated by the arrow (click on pictures to expand and rotate stage--plane light on the left, crossed Nicols on the right)
Identify the mineral indicated by the arrow (click on pictures to expand and rotate stage--plane light on the left, crossed Nicols on the right)
Identify the mineral indicated by the arrow (click on pictures to expand and rotate stage--plane light on the left, crossed Nicols on the right)
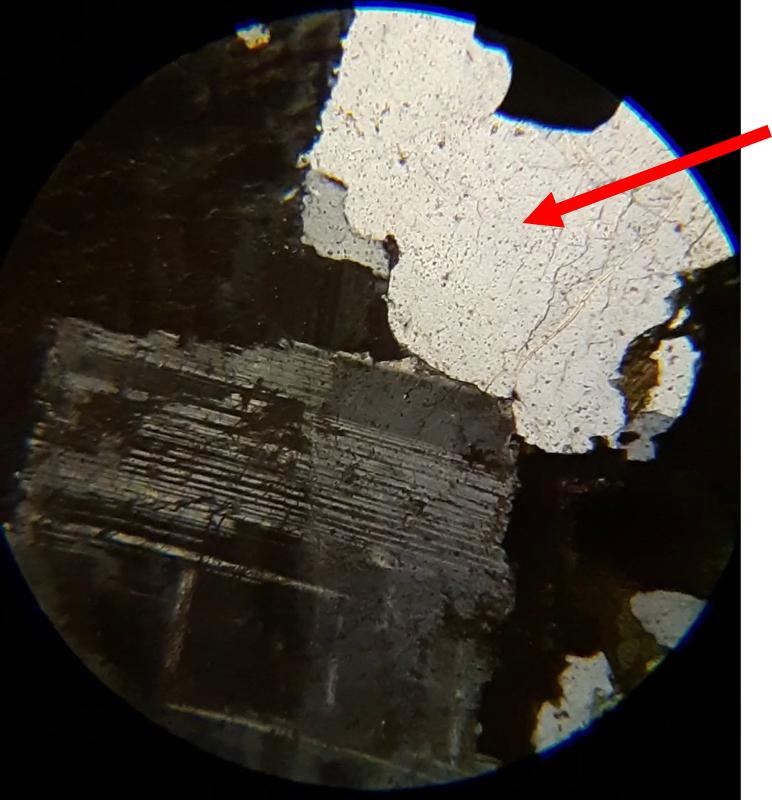
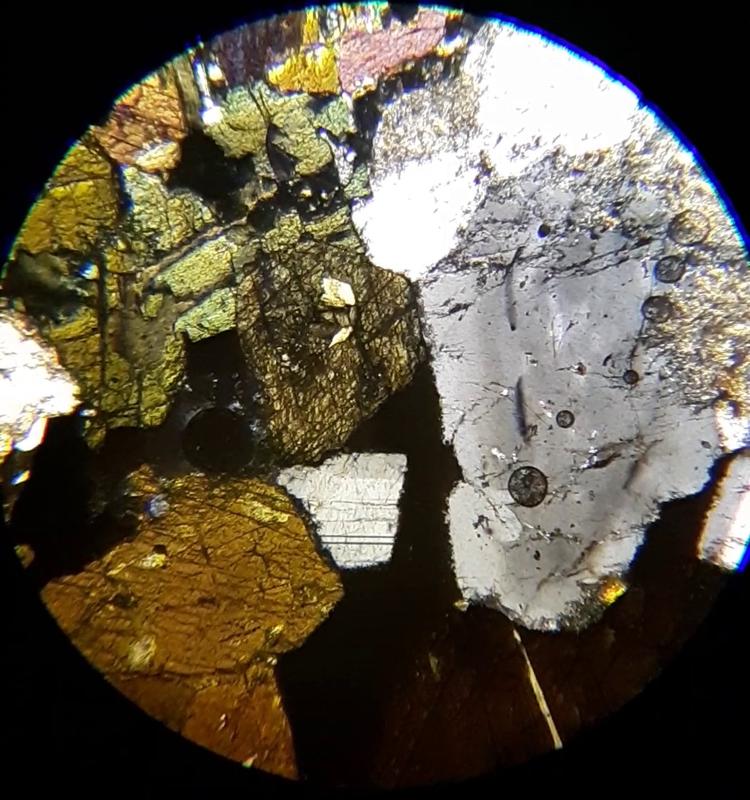
Identify the mineral indicated by the arrow (click on picture to expand and rotate stage)
Note that plane light and crossed-Nicols are combined in this sample, which gives you the ablity to "blink" back and forth between plane light and crossed-Nicols—a helpful ability for this sample.

Identify the mineral indicated by the arrow (click on picture to expand and rotate stage)
Note that plane light and crossed-Nicols are combined in this sample, which gives you the ablity to "blink" back and forth between plane light and crossed-Nicols—a helpful ability for this sample.
Identify the mineral indicated by the arrow (click on picture to expand and rotate stage)
Note that plane light and crossed-Nicols are combined in this sample, which gives you the ablity to "blink" back and forth between plane light and crossed-Nicols—a helpful ability for this sample.
Identify the mineral indicated by the arrow (click on picture to expand and rotate stage)
Note that plane light and crossed-Nicols are combined in this sample, which gives you the ablity to "blink" back and forth between plane light and crossed-Nicols—a helpful ability for this sample.
This ends Part 1--the identification of common rock-forming minerals. Part 2 will look at the textures of rock under the microscope and the geological story that those texture tell.
As a prelude to part 2, consider the following:
Detrital sedimentary rocks have a detrital texture, that is a texture that you get when mineral grains are "stacked up" during deposition. Igneous rocks have a crystalline texture, that is a texture where the mineral grains have grown together as they crystalllized from a liquid. Metamorphic rocks formed by differential stress (that is, stress that is different in different directions) develop a foliated texture, that is a texture in which platy minerals like muscovite and biotite are lined up in the same direction and equant grains like quartz have been flattened along the same trend. Match up the rocks below with their rock type: Sedimentary, Igneous, and Metamorphic.
last updated 4/24/2021. Text and pictures are the property of Russ Colson.